Table of Contents
- Getting Started
- Agent-Based Management
- Common Tasks
- Data Providers
- Directory Services
- Auditing
- Hosts
- Templates
- Template Properties
- Batch Update Templates
- Assign Templates
- Log Management Templates
- SCAP Compliance Monitor
- Active Directory User Monitor Templates
- File and Directory Monitor Templates
- Windows Monitor Templates
- CPU Monitor Template
- Memory Monitor Template
- Disk Space Monitor Template
- Account Lockout Monitor Template
- Audit Policy Monitor Template
- Logon As Monitor Template
- Logon Monitor Template
- Performance Counter Monitor Template
- PowerShell Template
- Process Monitor Template
- RDP Session Monitor Template
- Registry Value Monitor Template
- Service Monitor Template
- SMART Disk Monitor Template
- System Security Monitor Template
- Windows Update Template
- WMI Query Template
- Task Scheduler Template
- Clock Synchronization Template
- Defragment NTFS Disks Template
- Network and Application Monitor Templates
- SSL Certificate Monitor Templates
- Database Templates
- Email Monitor Templates
- SNMP Monitor Templates
- Windows Accounts Templates
- Monitors
- Reports
- Auto-Configurators
- Filters
- Actions
- Schedules
- Environment Variables
- Options
- SNMP
- SSH Shell
- Syslog
- System Reset
- Shared Views
- Active Directory User and Group Filters
- Assign Actions
- Assign Azure Audit Logs
- Assign Consolidated Logs
- Assign Directories
- Assign Disks
- Assign Event Logs
- Assign Files
- Assign Services
- Assign Shares
- Auto-Config Host Assignment Properties
- Define CSV and W3C Log Entry Columns
- Define Log Entry Columns
- Define Log Entry Columns with Regular Expressions
- Executable Status
- Executable Timeline
- Explicitly Assigned Logs
- File Explorer
- General Executable Properties
- Report Columns
- Report Date/Time Ranges
- Report Security Event Log Filters
- Select Folder or File
- Target Files and Sub-Directories
- Command Line Interface
- Server Configuration
- Agent Configuration
- Troubleshooting
- Best Practices
- Terminology
Azure File Share Support
In this Topic
Tutorials


Overview
Corner Bowl Server Manager provides support for Azure File Shares, enabling users to monitor, utilize and manage their Azure File Shares effectively.
Common Tasks
- Monitor your Azure File Share size on disk.
- Get notified when files are added and deleted from an Azure File Share.
- Get notified when Azure Files change.
- Save Event Log and database backups to an Azure File Share.
- Monitor network speed to and from Azure File Shares
How to Add Azure File Shares
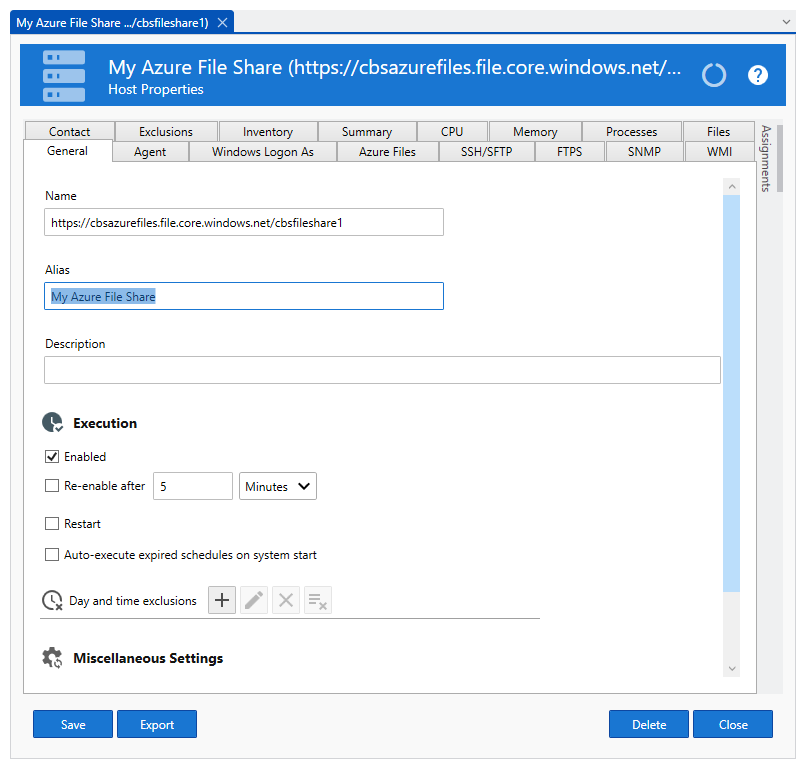
Azure File Shares are configured in Corner Bowl by adding a Host for each share whose name is the Azure File Share URL, flagging the host as an Azure File Share, then lastly specifying the Azure File Share Access Key.
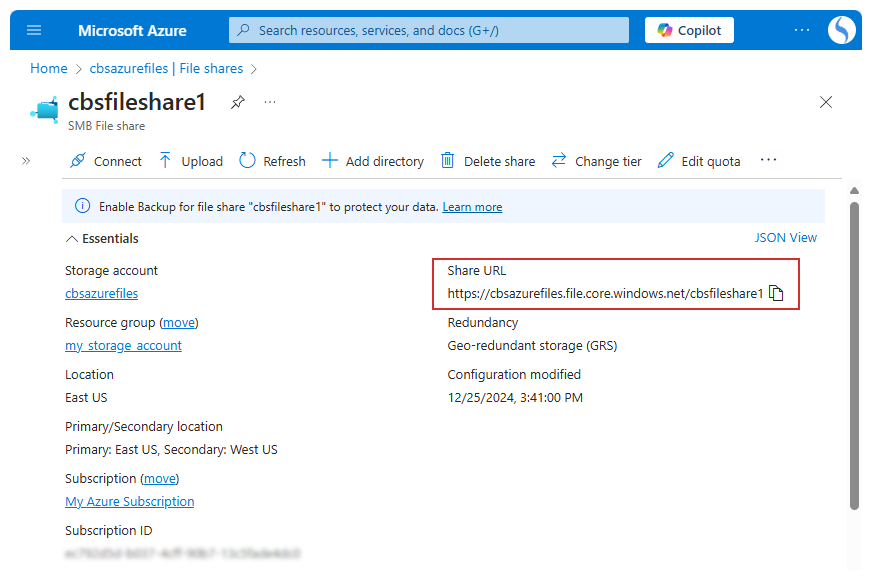
How to Copy Your Azure File Share URL to the Clipboard from the Azure Portal
- Log in to the Azure Portal: Open your web browser and go to the Azure Portal. Log in with your Azure account credentials.
- Navigate to Your Storage Account: In the left-hand menu, select Storage accounts and then click on the storage account that contains your file share.
- Access the File Shares: In the storage account's menu, select File shares to view all the file shares in that storage account.
- Select Your File Share: Click on the file share whose URL you want to copy.
- Copy the URL:
- In the file share's overview page, you will see the URL listed under URL.
- Click the Copy button next to the URL to copy it to your clipboard.
How to Create a new Host for the Azure File Share
- From the Menu Bar, select File | New. The Create New Object View displays.
- From the Create New Object View, click Computers, Devices and Endpoints. The Add Computer, Device or Endpoint Dialog displays.
- From the Add Computer, Device or Endpoint Dialog, press Ctrl+V to paste the Azure File Share URL from the Clipboard to the Name textbox.
- Click OK. The Host Properties View displays.
- From the Host Properties View, set the Alias to a meaningful name, for example My Azure File Share.
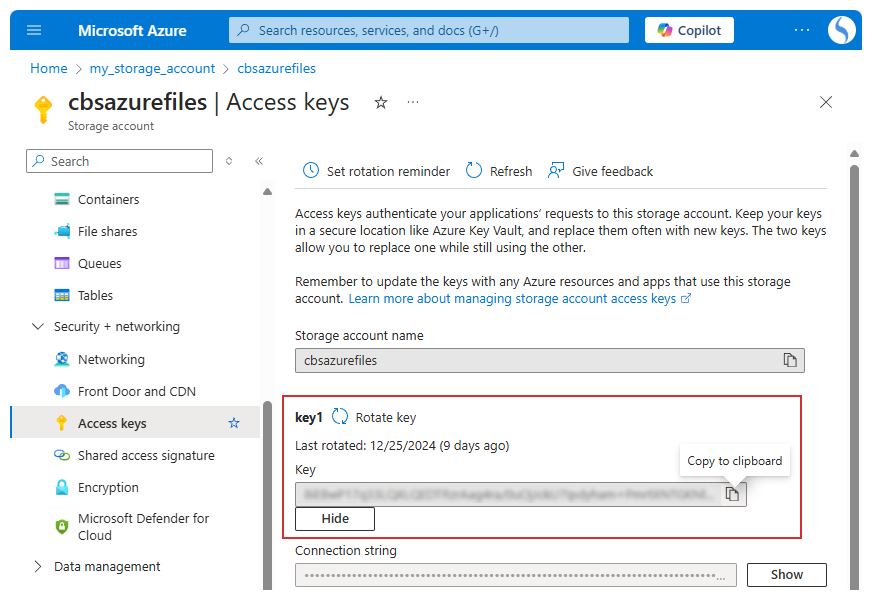
How to Copy Your Azure File Share Access Key to the Clipboard from the Azure Portal
- Log in to the Azure Portal: Open your web browser and go to the Azure Portal. Log in with your Azure account credentials.
- Navigate to Your Storage Account: In the left-hand menu, select Storage accounts and then click on the storage account that contains your file share.
- Access the Access Keys: In the storage account's menu, select Access keys to view the access keys for that storage account.
- Copy the Access Key:
- Under Key1 or Key2, click the Copy button next to the key you want to copy.
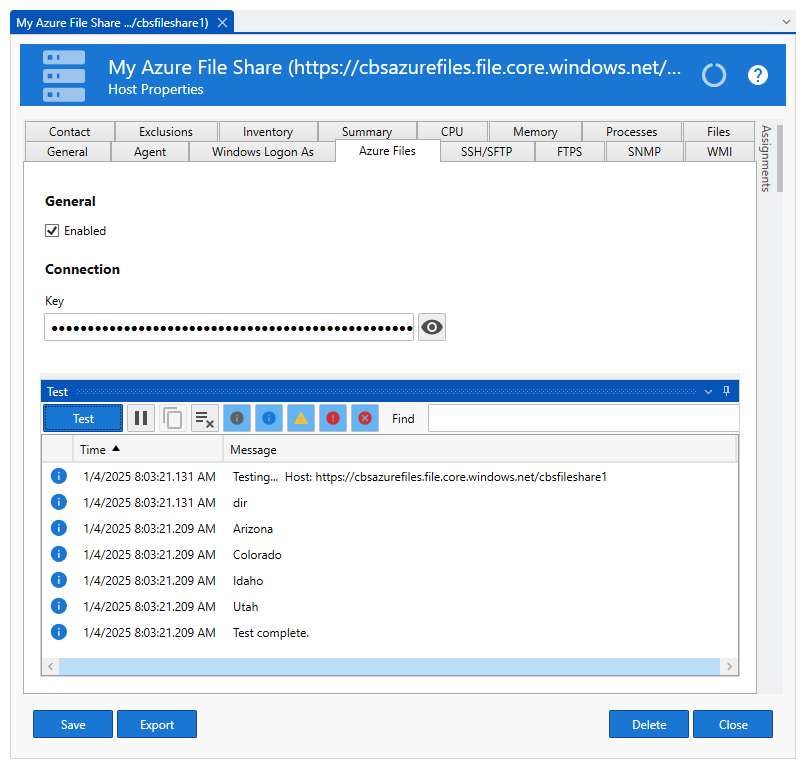
How to Flag the Host as an Azure File Share and Specify the Azure File Share Access Key
- From the Host Properties View, select the Azure Files Tab.
- From the Azure Files Tab, check the Enabled checkbox.
- Click in the Key textbox to set focus then press Ctrl+V. The Azure File Share Access Key is copied from the Clipboard to the Key textbox.
- Click Test then verify you are able to retrieve the list of sub-directories.
- Lastly, click Save.
Supported Templates
| Type | Description |
|---|---|
| Log Management | Configure Event Log, Syslog and text log file management. |
| Log Backup | Backup, compress, encrypt and sign native Event Log files (e.g. Archive Security Event Logs every night). |
| Log Consolidation | Configure log consolidation (e.g. Schedule Server Manager to download the latest Security Event Log entries and save to Microsoft SQL Server or MySQL). |
| Log Monitor | Configure log monitoring (e.g. Create a real-time text log monitor to scan an application log then trigger notifications when search criteria is detected). |
| File and Directory Monitors | Configure templates that monitor files and directories (e.g. File integrity, file collection and retention, directory size, etc.) |
| File Integrity Monitor | Validates the integrity of operating system and application files. |
| File Size and Activity Monitor | Monitor file sizes and activity (e.g. Get notified when a file size exceeds 1 GB or is inactive for 10 minutes). |
| File Collection and Retention | Backup files to a central location and delete expired files (e.g. Copy database backups to a central location then delete old backups no longer needed). |
| Directory Size Monitor | Monitor directory sizes (e.g. Scan a directory every hour and trigger an alert if the size exceeds a threshold). |
| Directory Cleaner | Schedule old data files to be deleted (e.g. Once a week delete database backups and IIS log files that are older than 30 days). |
| Network and Application Monitors | Configure templates that monitor network availability and applications (e.g. Ping, web server, email, etc.) |
| Network Speed Monitor | Verify the speed of your network (e.g. Get notified when your data transfer rate falls below an unacceptable threshold). |
How to Select Azure File Share Sub-Directories and Files
When creating a File and Directory Monitor Template select the Directories Tab.
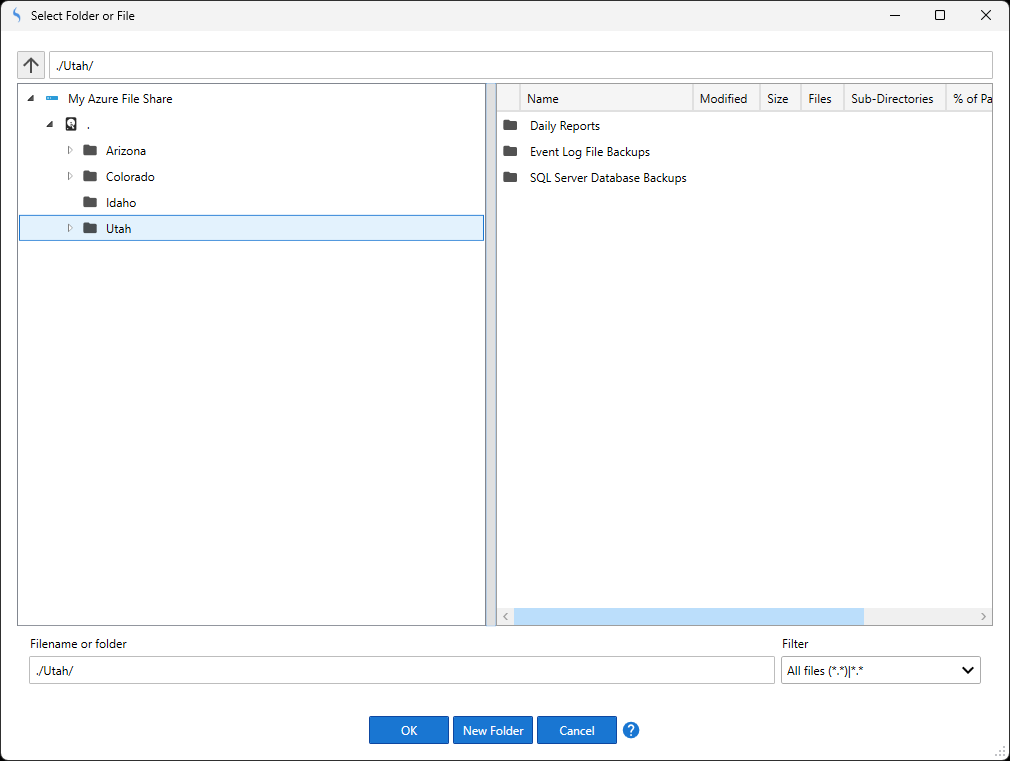
- From the Directories Tab, click the Browse Button. The Select Folder or File Dialog displays.
- From the Select Folder or File Dialog, select the target directory to monitor.
Directory Sizes
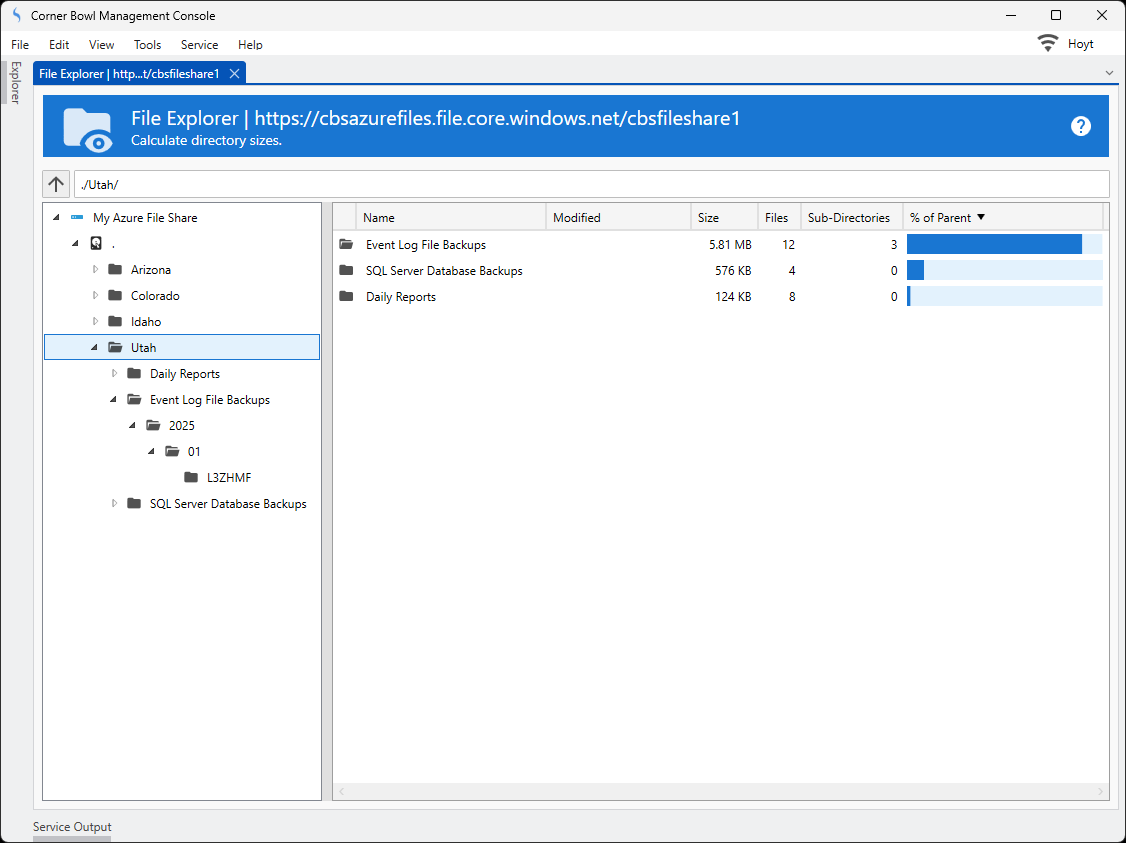
Corner Bowl includes a Directory Sizes feature enabling users to interactively review directory and sub-directory sizes.
- From the Explorer View, expand the root Hosts tree node then locate your target Azure File Share Host.
- Expand the target host.
- Right click on the host then select File Explorer. The File Explorer View displays.
- From the File Explorer View, right click on the "." tree node then select Calculate Size.
- The view recursively scans the entire directory structure then calculates and graphically displays the percentage of disk consumption of each parent directory.
How to Archive Windows Event Logs to an Azure File Share
Corner Bowl Server Manager enables users to archive and backup Windows Event Logs an Azure File Share. Backing up and moving files to an Azure File Share is implemented through the Log Backup Template. For more information see: Log Backup Template
How to Backup Files to an Azure File Share
Corner Bowl Server Manager enables users to backup as well as move local files to an Azure File Share. Backing up and moving files to an Azure File Share is implemented through the File Collection and Retention Template. For more information see: File Collection and Retention Template
